 Given the fact that many of us appreciate milky coffee such as lattes, the ultimate secret behind a fantastic cup of coffee lay in steaming the milk properly.
What you want to make is a thickened milk with foam all through, a liquid that will pour out like a sauce and has a sweet and rich flavor. This kind of froth is known as microfoam, and by micro I mean that the foam is really part of the milk, not just a coating of froth on top. With some practice and the proper equipment, you will soon be making the most of frothy delights in no time.
What kind of milk?
You can basically froth any type of milk, but each type reacts a little differently. And the fact, that milk with higher fat tastes sweeter than skim or low fat when steamed, and fresher milk is always first choice. We suggest that rookies begin with skimmed and in time evolve to whole milk, it’s much easier to start off with lighter milk.
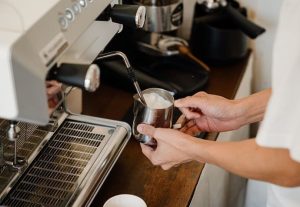
The making of froth
Turn on your espresso machine and allow have it heating up to its usual brewing temperature. Then load your milk pitcher less than 50 percent with cold milk, and drown a thermometer (if you have one) into the milk. You can prepare your coffee drink before or after, at the moment, it’s not important.  Next you want to make sure your machine will create the ideal froth. Do get that near-perfect froth, you need to have dry steam, meaning you need to bleed out the water from the pipe that runs from the boiler and the valve that manages the flow of steam. If your espresso machine has no always enabled steam system, turn it into steam mode, wait for about 10 seconds and next open the steam valve lightly into an empty container right until water turns to steam. Wait about half a minute, and do this procedure all over again. You should now have that proper dry steam. If your unit does not have always on steam, you need to start frothing the milk immediately.
So where to place the tip? Top, or bottom? It’s known that during the frothing procedure, you have to hold the tip at the upper end of the middle zone, so that you sometimes hear a sucking sound. While you do this, check out your milk to get to know the zones and how the froth will turn out. It’s also important to have the tip in the suitable horizontal location. This in general creates a circular current that is folding the milk with air that along with bubbles makes microfoam. You can move the tip around up and down very slowly and then witness the creation of perfect froth. Now you see the foam starting to rise, now it all makes sense why you need to fill the pitcher/cup only half way.
Also note on the milk temperature – it’s an equally important element is the temperature of the milk. At 95°F, the air in the milk is ideal to be effective to keep the bubbles. Too cold or too hot can ruin the making of forth, a pro tip – cup too hot to hold in hand means it’s over 100°F.
Ready to pour
Wait about 15 seconds after the frothing process and then pour it on top of your coffee drink. That’s it, enjoy your frothed coffee!
 Coffee – It’s more than just coffee. The way we see and taste coffee has changed dramatically thanks to specialty shops. There are many ways to prepare it. People are now more aware of the subtleties that can affect the flavor. What is the real difference between espresso and filter coffee?
 Filter drip coffee simplicity
 Do you dream of being a barista at home? Making your favorite coffee drink and then finishing it with an impressive piece of art?
 How to make a Latte Art Rosetta